(To read full post, you may need to click post title to read in your browser.)
I was at loose ends in the studio one afternoon and felt like just making something pretty. I dug out these rubber stamps I'd carved way back in 2015. (I date-stamp my workbook or I'd never remember when I did anything!).

Working on inexpensive calligraphy paper and using leftover reddish "mystery mix" ink, I stamped a random pattern. Occasionally, without re-inking the stamp, I'd stamp again, going for a sort of shadowy background.

I tried to be mindful of the negative space -- the white background -- but I didn't want to overthink things. So mostly I simply stamped away.


Rats! Just realized I forgot to photograph the print one step back! Try to imagine it without the dark flowers. The darker pink is the first stamp. The paler flowers are the second stamp without re-inking. And then the overall pink is a roll of the reddish ink mixed with enough modifier to make it pale and transparent.
Then I wondered what would happen if I mixed a tiny bit of black ink with the original red and stamped a final layer.

However, when I started to clean up, I noticed this:

This is the newsprint underneath to protect the work surface. The calligraphy paper was saturated with ink by the time I got to stamping the dark flowers. (I really should have given the print a week or so to dry before I carried on, but I didn't!) Look at how the inks bled through the calligraphy paper into the newsprint. Here's another example:

I couldn't resist cleaning off the brayer on the newsprint and adding to the pattern. This is what I got:

There is something here that appeals -- like looking through sheer curtains at a tree in full blossom. Will likely tinker with it and do more overprinting or maybe chop it up for collage... It's too pretty to toss!
And then, the next morning, the first two prints were dry.

And they became this -- covers for a concertina:

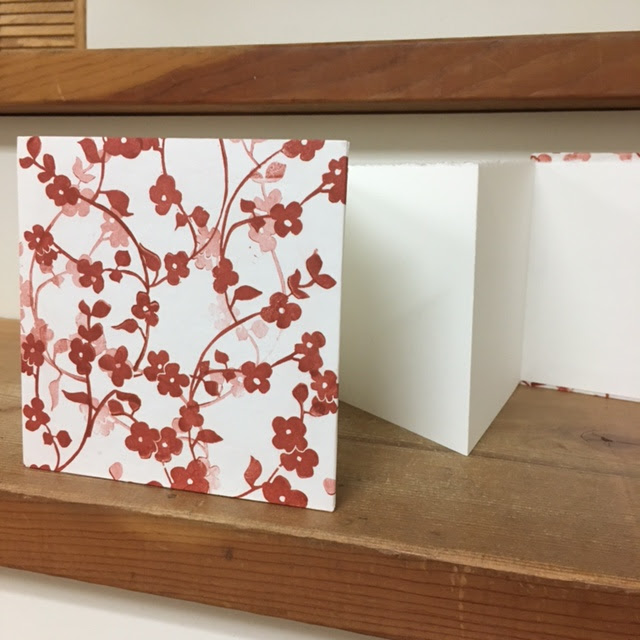
If you remember this post describing how I make my concertinas you might notice in the above photos that I'm no longer cutting the board for the covers a good quarter inch larger than the paper. I didn't like how the paper sagged when the concertina was open for display. Now I'm trying for a border closer to a fat eighth of an inch -- tight enough the sag on the open concertina is minimal and yet generous enough that it's still easy to center the paper on the cover.
Now what to make with that pretty concertina? Hmmm...