Thursday, August 18, 2022

Cool Hand Cuke!

(To read full post, you may need to click blog title to view in your browser.)

This seed packet had been on my work table for some time. Most seed packets are printed on glossy paper but this one had an appealing matte finish.


For fun, I chopped it up with the idea of making a few collage post cards. Then scrounged through the scrap bins for some coordinating papers.


Went for mostly green papers but influenced by the packet's red maple leaf logo also threw in some red ones. Then just started playing around.


I prefer cut paper to torn edges (although I enjoy torn paper in other people's collage work) and thought the long narrow strips referenced the long English cukes!

Moved the bits and pieces around over a day or so, trying not to overthink their placement. When I was mostly happy, I glued them down.


Now what? Thought about drawing over top in black. Or stamping some text. Cool Hand Cuke maybe? I know, corny! Then -- and who knows where these ideas and influences come from -- circles popped in my head. Found some calligraphy paper I'd printed with this great red (a mix of vermillion and iron oxide).


Added black blossom shapes. And a black dot.


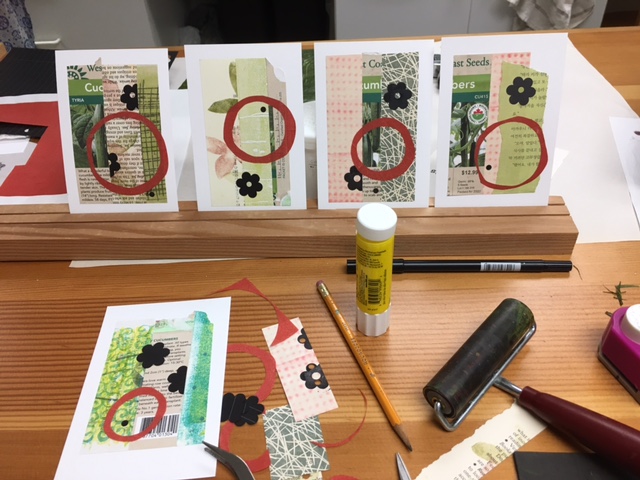
And then noticed an interesting pattern emerging. I'd placed all the red circles to the right! With the last two post cards, I made myself go left. Which just felt wrong!


With collage, I find it can be the final detail that suddenly makes the composition work for me. I played around with moving the flower shapes and the dot.


The travelling dot! Down, middle, up! Here are the final versions:


And the final six:


Now it's time to send them out into the world!

Thursday, August 4, 2022

Decisions, Decisions!

(To read full post you may need to click post title to view in your browser.)

The other day finishing some notecards in The Forest series (where I print with ephemera from our forest -- feathers, twigs, cedar etc) I was struck by how many decisions even a small art project requires.

In the early stages of developing the series I trialed both Stonehenge printmaking natural white card blanks and a tan card stock.


The tan cardstock was a little light for 5x7-inch cards and I decided to work solely with the heavier printmaking blanks. But I liked the look of the prints on the tan. And the day's project was to finish the small number of tan prints as a gift for a friend.


A lightweight card can be given a substantial presence with a paper liner. Like with the cards below -- my first attempt several years ago at carving a wood block.


Here, I'd stamped a coordinating image on the liner. So it didn't compete with the cover print I used lots of transparent ink creating an almost watermark-like effect. Something like that might work nicely with the forest prints. But I had cream paper on hand -- a heavyweight printer paper with a faint pattern that resembled vellum.


Okay! Going with the cream paper. Then a quick decision on how to attach the liner. Sometimes it's a swipe of glue stick but my preferred method adds a nice handcrafted touch. The elegant pamphlet stitch detailed in this post. Now to choose a thread and a colour for the binding.


From the top is a rust crewel yarn, three colours of embroidery thread, a cream crochet cotton and, finally, black embroidery thread. My first choice was the crewel yarn. It had a beautiful twist and the colour was so rich. But it almost overpowered the images. The black was too much. In the end, I went with the cream crochet cotton.

Now, a three-hole pamphlet stitch or a five? I was only binding a single sheet of paper so the three was ample.

A tricky decision next. Knot on the inside of the card? Or the outside?


Liked both but decided I wanted the knot to show. But how long to leave the ends? (I know, this gets ridiculous! But I love the finishing details.)


I do like the energy of the longer tails but I know, from experience, what a pain these longer tails can be at the packaging stage. So short it is.


Now my favourite part -- finishing up the back of the notecard.

A number of small decisions here. Tiny feather prints or a stamped 'forest'? Torn strips of paper, cut paper, circles?


The backs of the cards give lots of leeway to play around without having to narrow my options down to a single choice. Think that is why I enjoy this part so much.


I won't go into all the decisions the website label required. Those were largely made years ago. So, hey, we're done!